
RULE BOOK
Welcome, Traveller…
Escape the Dark Sector is a simple sci-fi adventure game with a focus on atmosphere, storytelling, and player cooperation. It takes about 2 minutes to set up, lasts around 45 minutes, and no two games are ever the same.
The rules of the game are quite simple, but we do recommend you read this rule book in full before your first game, even if you have played another game in the Escape the Dark series before - there are plenty of differences.
A word of warning: despite its simple nature, this devious game will often defeat you! If you fail, try again. You’ll have fun exploring the space station every time, regardless of the outcome.
The Object of the Game
Confined to the detention block of a vast space station, you and your fellow crewmembers embark on a desperate mission to find your ship and escape. However, the depths of space are not to be travelled lightly, and first you must overcome a great many dangers, traps, and terrors – each of which is represented in the game by a large, beautifully illustrated chapter card.
The object of the game is to overcome every card in the mission deck while keeping all members of the crew alive to fly your ship home. If you do this, you all Escape the Dark Sector and win the game together. However, if any member of the crew dies along the way the game ends immediately – you all lose!
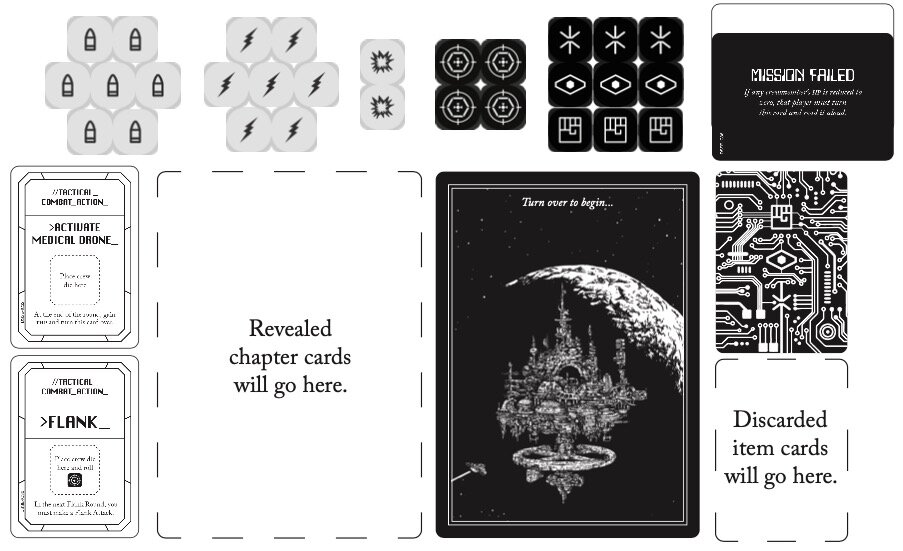
Components


Setting Up the Game
1) Create the Mission Deck
-
Shuffle the boss cards and deal one face down.
-
Shuffle the Act 3 chapter cards and deal four face down onto the boss card.
-
Repeat the previous step for the Act 2 chapter cards, and finally for Act 1.
-
Shuffle the start cards and place one face down on top.
2) Set up the Mission area
-
Shuffle the Starting Weapon cards and set them aside until called for.
-
Shuffle the item deck and place it to the right of the mission deck, leaving space below it for a discard pile as shown.
-
Place the chapter dice, hit dice, and ammo dice above the mission deck.
-
Place the tactical combat action cards face up to the left of the mission deck as shown, leaving a gap into which chapter cards will be placed during the game.
-
Place the epilogue cards face down above the item deck as shown.
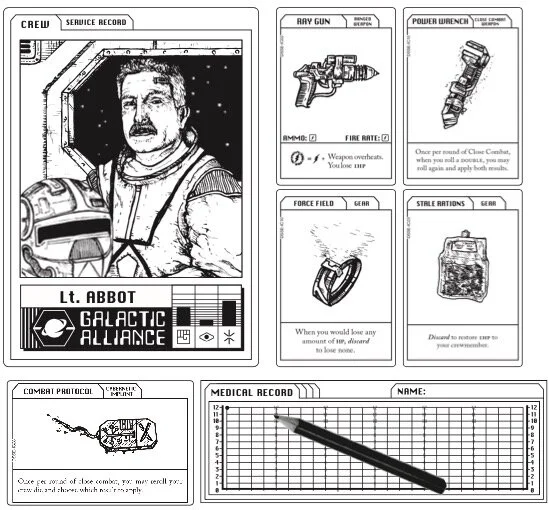
3) Select Crew & Cybernetics
-
Lay out the crew and cybernetics cards face up where all players can see them.
-
Each player must now choose one crewmember and one cybernetic, placing these cards in front of them, and taking the crew die bearing their crewmember’s name.
Crew Dice
Each crew die has a unique mixture of the game’s three traits on it, which corresponds to how highly rated that crewmember is in each trait. Rolling a crew die represents a character making an attempt to do something. Challenges in this game often require a specific trait to be rolled, so the more highly rated the character is in the required trait, the more likely you are to roll the required symbol and pass the challenge.

4) Prepare Medical Records
Each player must keep track of their crewmember’s health points (HP) using the medical record sheets and pencils provided.
-
Take a new medical record sheet for each member of the crew, write their name on it, and mark the starting hp with a dot as shown below.
-
Each member of the crew starts with 12hp.
Lay out your character area like this. The empty space to the right of your crew card is your inventory, where you will store weapons and gear collected during the mission.

You’re ready to play!
Playing the Game
Gameplay involves turning over the cards of the mission deck one at a time and completing the challenges revealed. If you survive a card, turn the next one, and so on.
Turn Order
There is no turn order. Instead, you must decide as a group who will turn over each chapter card. If you are the one who turns over a card, this represents that your member of the crew is personally leading the group into the unknown.
‘YOU’ effects
Some chapters contain nasty surprises for the crewmember who leads into them. When the word you is written in bold capital letters, it means the effect applies only to your crewmember, because they went in first!
Turning Chapter Cards
When turning a chapter card, place it face up to the left of the mission deck, as though you had turned the page of a book. Read the italic story text aloud to set the scene, then follow the instructions to complete the chapter.

Completing Chapters
The instructions on each chapter card will explain what must be done to complete it. You may be asked to make a choice, to test your crewmember’s skills by rolling their crew dice, or to begin combat!
Most of these challenges are simple and self-explanatory. Others, like engaging in combat, are explained in more detail in the following pages.
Tip: You’ll find an FAQ on how specific chapter cards work at themeborne.com/faq
How the Story Unfolds
Escape the Dark Sector is played over three acts, each with a distinct story, atmosphere, and level of difficulty!
Act 1: The Detention Level
We join the story just as you and your fellow crew break out of your cell in the detention level. In the narrow passages of this part of the station you will encounter brutal guards, savage security systems, and even other escaping prisoners…

Act 2: The Heart of the Station
Explore this eclectic and terrifying sprawl of dive-bars, laboratories, and alien hives as your adventure gathers speed. Meet mercenary crews, curious nobles, tech-peddlers, and beings from distant worlds…

Act 3: The Forgotten Zones
Finally you venture into the unmapped conduits, smugglers’ hideaways, and vast docking bays of the station’s outer reaches—facing gangs of cyberpunks, hideous mutants, and swarms of killer organisms.
And then, behind the last door, prepare for a climactic battle against the boss – to reclaim you beloved starship and Escape the Dark Sector.
The End of the Game
Continue turning and completing chapter cards until you get to the bottom of the mission deck, defeat the boss, and win the game - or until one member of the crew is killed (their HP is reduced to zero) and you lose the game.
When the game is over, read the corresponding epilogue card aloud (Victory or Defeat) to bring the story to an end.
Good luck, traveller...
Item Cards
There are two categories of item cards: Weapons and Gear.
Drawing Item Cards
Item cards enter play when drawn from item deck, which happens in one of two ways:
-
When the text of a chapter card instructs you to draw them.
-
After surviving combat, you draw the number of item cards indicated on the chapter card by this icon:

When drawing any number of item cards, place them face up in a temporary item pool where all players can see them. Then, decide as a group how the items will be distributed among the crew. To take an item, place it in your crewmember’s inventory.
Unwanted items can be placed face up in the discard pile at any time. If the item deck ever runs out, shuffle the discard pile to make a new deck.
Carrying Items
The items a member of the crew is carrying must be placed in their inventory area. Each member of the crew begins the game with an inventory capacity of four vacant ‘slots’.
Most item cards have a portrait orientation, meaning they occupy a single slot. A crewmember can carry up to four of these items.

Some larger items have a landscape orientation, meaning they occupy two slots. Only two of these can be carried by a single member of the crew.

A member of the crew can carry a mix of single-slot and double-slot items at the same time, but they can never carry more than four slots’ worth of items in total.
Using Items
The text on each item card describes what it does. Some items must be discarded to be used, but otherwise you can use them multiple times.
Items in a crewmember’s inventory can be used by them at any time, unless the item card itself indicates otherwise. You cannot use items in the inventory of another member of the crew.
Items can also be used directly from the item pool. For example, if your inventory is full and new item cards are drawn, you may use them immediately if applicable.
When a chapter requires a player to roll a certain trait ‘in one attempt’, that single attempt includes the use of items and/or cybernetics to modify the roll before it is applied. For example, a player could discard a Chrono-Bomb to re-roll their die and apply the second result, and it will still only count as a single attempt.
IMPORTANT — In both Ranged Combat and Close Combat, each member of the crew can only use two slots’ worth of weapons per round. For example, if a crewmember is carrying four pistols, they cannot shoot all four in a single round— they can shoot two in a round, and then shoot the other two in a later round. There is no limit to the number of items of gear that can be used in a single round, and crewmembers may use weapons and gear in the same round if applicable.
Exchanging Items
Items can be exchanged between members of the crew in three ways:
1) Between chapters
Members of the crew are free to exchange items between chapters, but must ensure that before the next chapter card is turned no member of the crew has more than four slots’ worth of items in their inventory.
2) When drawing new items
Whenever new item cards are drawn into the item pool, crewmembers can exchange items with each other.
3) When a player takes the trade action during combat:
You may give and/or take any number of items from one other crewmember, so long as this does not result in you or them exceeding four slots’ worth of items at any time.
The other crewmember may still perform one action in the round you trade with them, so long as that action does not involve the use of any of the items being traded.
You may immediately use any items you take (e.g. eating Stale Rations), with the exception of items which would normally require an action to use (such as firing a ranged weapon).
Combat
There are two types of combat in Escape the Dark Sector – Ranged Combat and Close Combat. Each has different rules and these are explained in the following pages. When a chapter card instructs you to begin combat, that instruction applies to all crewmembers and gives you the choice, as a group, of whether you wish to all begin Ranged Combat together or all begin Close Combat together.
However, you may be instructed to begin Ranged Combat, or to begin Close Combat, in which case you have no choice – the storyline has thrust you into one or the other!
IMPORTANT — Ranged Combat can be followed by Close Combat but once you begin Close Combat you cannot revert to Ranged Combat in the same chapter.
Setting up Combat
Setup is the same for both types of combat:
Place chapter dice in a row beneath the current chapter card, matching what is shown at the bottom of the card.


This symbol means you must roll an additional chapter die for each member of the crew and add them to the row. For example, with two members of the crew you would roll two additional chapter dice when you see this symbol.
The row of chapter dice represents the number of wounds that must be inflicted upon the enemy to defeat it—the more chapter dice, the harder this battle will be. The goal of combat is to remove all these dice by taking actions to make attacks. When all chapter dice have been removed, the enemy is defeated and combat ends.
Combat Actions
Combat is fought in a series of rounds, repeating until the enemy is defeated or one of the crewmembers is killed. Each round represents a few seconds of battle during which you must formulate a plan of attack as a crew by declaring and then executing one action each.
Some actions are only available in Ranged Combat and some are only available in Close Combat. Others, called Standard Combat Actions, can be executed during either type of combat. All actions are explained in detail in the following pages, and they are listed on a reminder card in the box which you may find useful to refer to as you read this section.
Using the Medical Record
Your current hp is shown on the medical record by a dot or ‘point’. These points always go on the intersection of two lines. Whenever you lose or gain HP you must immediately adjust your medical record by plotting a new point on it. The new point always goes one vertical line to the right of your current one, and then moves up or down by as many horizontal lines as the number of HP you are gaining or losing. Plot your new point, then join it up to your previous one.
Example:
You begin the game with 12HP...
A: You lose 2HP, plotting a new point one line to the right and two lines down.
B: You gain 1HP, moving you one line to the right and one line back up again.
C: You lose 3HP, which puts you one line to the right, three lines down.

Ammo Dice
Ammunition is represented in the game by ammo dice. Different weapons use different ammunition and there are three types:

Whenever you find a ranged weapon it comes fully loaded with ammo and you must immediately take the number and type of ammo dice shown and place them on the card. Ammo type and capacity is indicated by the ammo value.

Ammo dice are rolled when taking the SHOOT action in Ranged Combat.
Hit Symbols
Rolling an ammo type symbol means you have scored a hit of that type.


A blank side means you missed the target - this die has no effect.
Special Symbols

Ammo dice also have special symbols on them. The effect of special symbols is described on each weapon card – and be warned, they are not always positive!

If you roll this symbol, your weapon has jammed! None of the other ammo dice you rolled this round are applied, even if they rolled hits. Nothing came out of the barrel. You keep all your ammo dice, but you must still apply the result of the HIT DIE you rolled (see step 3 of the shoot action).
Ranged Combat
When Ranged Combat begins, all members of the crew are assumed to dive into cover where they are safe from enemy fire. Then, you must choose one Ranged Combat action for each member of the crew before simultaneously carrying them out.
Ranged Combat Actions
The actions available to members of the crew during Ranged Combat are SHOOT and FLANK, along with all Standard Combat Actions
• Shoot
This action involves popping out of cover to exchange fire with the enemy – you will SHOOT, hoping to inflict wounds and remove chapter dice, and you will be shot at, risking a loss of HP. For a crewmember to take this action, they must have a ranged weapon loaded with at least enough ammo to match the lowest Fire Rate of that weapon (see example below).
Important: If the SHOOT action is not declared by at least one player then Ranged Combat does not take place and no Ranged Combat actions can be taken. Instead, a round of Close Combat begins meaning only Close Combat actions or Standard Combat Actions can be taken.
To take the SHOOT action:
1. Roll
Roll the number and type of ammo dice indicated by the Fire Rate on your weapon card, along with one HIT DIE.

2. Apply Ammo Dice
Apply the results of the ammo dice rolled by consulting the enemy’s hit chart, found in the lower right hand corner of the chapter card artwork. Hit charts show how many hits of each ammo type are required to inflict one or more wounds on the enemy. For each wound inflicted a player may remove one chapter die of their choice. Some types of ammo do more damage to certain enemies than others.

The hit chart for this enemy shows that one ballistic hit will inflict one wound, allowing a player to remove one chapter die of their choice. The enemy is resistant to energy weapons—it will take two energy hits to inflict a single wound. The most effective method for taking down this particular enemy is explosives, with one hit meaning three wounds are inflicted and the player can remove three chapter dice of their choice!
IMPORTANT—After rolling ammo dice and applying the results, they are all discarded (unless the weapon jams). Place them back above the mission deck.
2. Apply Return Fire
Lastly, apply the result of the hit die rolled. This represents the enemy simultaneously returning fire.

Crewmembers who take damage should subtract this number from their hp and adjust their medical record immediately.
• Flank
When taking the FLANK action, you bravely dash out of cover, sprinting through the crossfire to reach a vantage point. Next round you will get to act in a bonus FLANK Round, taking the enemy by surprise and potentially dealing extra damage.
Only one member of the crew may perform this action in a single round. To take the FLANK action:
1) Place your crewmember’s die on the FLANK tactical action card.
2) Roll a hit die. If you roll a hit, they suffer a glancing blow and lose 1HP.
IMPORTANT — A crewmember only ever loses 1HP performing the FLANK action, regardless of the ranged attack value of the enemy.
Ranged Combat Example
Player one, controlling Lt. Abbot, declares the flank action. Player two, controlling Lt. Tailor, declares the shoot action. These two actions are then carried out simultaneously.

Ending a round of ranged combat
After all players have fully resolved their chosen action, the round ends. If there are chapter dice remaining beneath the chapter card, the enemy has not yet been defeated and a new round of combat begins with each player declaring the action their crewmember will take.
If no player declares the shoot action at the beginning of this new round, Close Combat begins instead and there can be no more Ranged Combat actions this chapter.
Close Combat
Setting up Close Combat
If Close Combat follows Ranged Combat, any remaining chapter dice carry over. If not, simply follow the steps for setting up combat described earlier.
IMPORTANT—If it was not used during Ranged Combat, turn the flank card to the Flank Unavailable side. This action cannot be taken in Close Combat.
When Close Combat begins, all members of the crew choose one action each and then execute them simultaneously.
Once Close Combat has begun, there can be no more Ranged Combat this chapter.
Close Combat Actions
The actions available in Close Combat are fight, along with all Standard Combat Actions.
• Fight
This action involves brutal hand to hand combat with the enemy - you will attack, hoping to hit and inflict wounds, and the enemy will attack you in return.
Unlike Ranged Combat, you do not need a Close Combat weapon to take the FIGHT action – you are highly a trained crew and will use your bare hands if necessary!
IMPORTANT—The fight action must be taken by at least one member of the crew each round of Close Combat.
The FIGHT action has two simple steps each round: Attack and Defend:
1. Attack
Players who have chosen the FIGHT action for their crewmember must simultaneously roll their crewmember’s dice to make an attack. Then, in any order they choose, they resolve those attacks one at a time as follows:
If what has been rolled on a crewmember’s die matches any of the chapter dice laid out beneath the chapter card, that crewmember has hit and inflicted a wound. The hit chart is not consulted. Instead, one matching chapter die is removed and placed back above the mission deck. If they did not roll a match, they miss and fail to wound the enemy this round.

A DOUBLE is an extra powerful attack, inflicting up to two wounds if there are two matching chapter dice to remove.
Each DOUBLE is also surrounded by a shield symbol. This means that in addition to any wounds inflicted by that crewmember they have blocked and defended themselves against the enemy’s attack.
2. Defend
If any chapter dice remain beneath the chapter card after each crewmember’s attack has been fully resolved, the enemy is still alive and attacks back! The enemy does not roll a hit die in Close Combat. Instead, every member of the crew who attacked this round and who did not block is automatically hit and is dealt damage simultaneously—each losing HP equal to the Close Combat value of the enemy, found at the bottom right of the chapter card:

For example, you lose 2hp when this enemy hits you in Close Combat.
Crewmembers who take damage should subtract this number from their hp and adjust their medical record immediately.
Ending a round of close combat
After all players have fully resolved their chosen action, the round ends. If there are still chapter dice laid out beneath the chapter card, begin the next round of Close Combat by declaring actions as a crew and then simultaneously carrying them out.
Continue rounds of Close Combat in this way until the enemy is defeated or until a member of the crew is killed.

The Flank Round
When a new round of combat is about to begin and a member of the crew is on the flank, a bonus Flank Round takes place before the normal combat round - they get to make a surprise Flank Attack! If there is no crewmember on the flank, you skip the Flank Round.
Flank Attack Actions
During the Flank Round, the crewmember on the flank is the only one to act. They must carry out one of the following Flank Attacks:
• SHOOT (Flank Attack)
The standard SHOOT action with the following exceptions:
-
If the attack inflicts a wound, remove an additional chapter die of your choice.
-
There is no Return Fire, you do not roll a HIT DIE.
• FIGHT (Flank Attack)
The standard FIGHT action with the following exceptions:
-
If the attack inflicts a wound, remove an additional chapter die of your choice.
-
The enemy deals no damage to the crewmember, even if they do not block.


IMPORTANT — If a player chooses shoot (Flank Attack) during the Flank Round, the subsequent normal round of combat can be either Ranged Combat or Close Combat, it is up to the players to decide as normal. However, if a player chooses fight (Flank Attack) during the Flank Round, the next normal round must be Close Combat and there can be no more Ranged Combat this chapter.
Ending a Flank Round
When you have fully resolved a Flank Attack, the Flank Round ends. Retrieve your character die and turn the flank tactical action card face down. The FLANK action is unavailable for the rest of the chapter—the enemy won’t fall for it twice!
After the Flank Round, begin a normal round of combat with all crewmembers taking actions as usual, including the crewmember who acted in the Flank Round.
Standard Combat Actions
The following actions can be taken by members of the crew in either Ranged Combat or Close Combat.
IMPORTANT—For one or more crewmembers to take any of the following actions, at least one other crewmember must be taking the SHOOT action (if in Ranged Combat) or the fight action (if in Close Combat).
When taking any of the following actions, you are not targeted by enemy attacks – your crewmates are keeping the enemy busy!
• Reload
Choose a weapon card in your inventory. Take the number and type of ammo dice indicated by the ammo value and place them on it. If doing so would exceed the ammo capacity of the weapon, take only as many as are needed for it to be fully loaded.
• Activate Drone
Only one member of the crew may take this action in a single round. - Place your crew die onto the activate drone tactical action card.
At the end of the round, take your die back and restore 1HP to your crewmember, updating your medical record accordingly. Then, flip the activate drone card to its drone recharging side—it cannot be used again this chapter.
• Trade
You may take one item from the inventory of one other crewmember. That crewmember may still perform one action this round, so long as the action does not involve use of the item being taken.
You may immediately use the newly acquired item, unless it is an item which normally requires an action to use (such as a ranged weapon).
• Take Cover
You take no action, staying in cover and waiting for your moment to strike.

Combat Specials
Some enemies have a Combat Special, a special ability or effect which is explained in full on the chapter card. These often break the standard rules in a devious way, making for fearsome opponents. Keep Combat Specials in mind while fighting – they are easy to forget in the heat of battle!
Ending Combat
Once a combat has begun, it only ends when all enemies involved are defeated, or when a member of the crew is killed.
Defeating an enemy in Ranged Combat
After all player actions are fully resolved, and after resolving return fire from the enemy, if all chapter dice have been removed the enemy has been defeated and combat ends.
Defeating an enemy in Close Combat
After all player actions are fully resolved, if all chapter dice have been removed the enemy is immediately defeated and (unlike in Ranged Combat) it does not make a final attack against the crew—combat ends.
After Combat
When the enemy is defeated, whether in Ranged Combat or Close Combat, the chapter ends. The crew take a moment to regroup, making a quick search of the area. Draw the number of item cards indicated by the search value at the bottom of the chapter card.

For example, when you see this icon draw one item card after combat.
Between Chapters
1) After completing a chapter and before turning the next chapter card, ensure both tactical action cards are flipped to their ready sides.
2) Then, all members of the crew are free to do any of the following, in any order they choose:
-
Use items in their own inventory, or those just drawn into the item pool.
-
Exchange items with each other, obeying normal inventory rules, or discard unwanted items.
-
Each member of the crew may take the RELOAD action once.
When everyone is ready, decide which player will turn the next chapter card and continue the game. Remember, you win when you reach the end of the mission deck and defeat the boss, but if any crewmember is killed the game is over and you all lose!
Solo Play
Escape the Dark Sector is designed to be as good with one player as it is with four. To play a solo game, simply choose any two members of the crew and begin the game as normal. You will make all the decisions and dice rolls yourself. There is just one thing to note:
You must decide which of your two crewmembers is going to lead the way into each chapter before you turn over the card. Any YOU effects in the text of that chapter will apply only to that character.
MISSION PACK 1 - TWISTED TECH
SUPPLEMENTAL RULE BOOK
Welcome, traveller...
Prepare to dive deeper into the bizarre and twisted technologies of the Dark Sector, where sinister intentions and limitless possibilities collide. As you witness the dark work of insidious bio-engineers exploring the gruesome extremes of human augmentation, ready yourself to wield an array of new, experimental weaponry against an onslaught of robotic adversaries programmed to destroy you...
How to Use This Pack
Mission Pack 1: Twisted Tech is an expansion pack for Escape the Dark Sector, introducing new rules and content to enhance your adventures. The following pages will explain how to incorporate this into your games.
You’ll need a copy of the Escape the Dark Sector core set, and we recommend being familiar with how to play it before adding any expansion content.
Components

CHANGES TO SETUP
For maximum variety each time you play, all content in the Escape the Dark Sector range is designed to be mixed together.
Before setup, simply add the new chapter cards, item cards, and boss card contained in this pack to their corresponding decks of your existing Escape the Dark Sector collection (the core set and any other expansions you may have).
Put the tech die with the chapter dice from the core set, and place the Special Ammo dice and Flame Ammo dice alongside the ammo dice from the core set.
Then follow the normal steps for setting up the game but add the following final step:
• Select Drone
As a group, choose one of the three new drones to take with you on your mission (details of what each drone does can be found in the following pages). Place the chosen drone in the usual tactical combat action space of the play area and put the other drones, including the original drone from core set, back in the box


USING THE NEW DRONES
The three drones included in this pack offer exciting new tactical options for crewmembers when performing the Standard Combat Action, activate drone.
Activating
In addition to declaring that your crewmember will take the activate drone action and placing your crew die on the drone card, you must now also declare whether you intend to activate the Basic or the Advanced function of the drone.
The functions of each drone are described in detail below and summarised on the drone cards themselves for easy reference during play.
The Basic function of each drone has a fixed outcome, but the Advanced function requires you to roll the TECH DIE to determine the outcome – and be warned, these drones are known to malfunction and the results are not always positive!
After activating either function, you must turn over the drone card to its Drone Recharging side as usual to end your action.
Surgical Drone
An advanced medical drone capable of sealing wounds and regenerating tissue in the heat of battle.
Basic Function: HEAL – Restore 1HP to your crewmember.
Advanced Function: REGEN – Roll the TECH DIE...


Replication Drone
A support drone capable of replicating weapons and items of gear the crew have previously encountered on their mission.
Basic Function: HEAL – Restore 1HP to your crewmember.
Advanced Function: REPLICATE – Roll the TECH DIE...

IMPORTANT – With the exception of the Replication Error! result, the Replicator Drone can only replicate items which are already in the discard pile, and only those with the keyword Weapon or Gear. You can freely search the discard pile to choose which items you want to replicate (but not the item deck).